Google continuously improves Android, making its interface more user-friendly and visually appealing. Android 12 is no exception to that. Google made several changes for the best way an app can reach users with custom push notifications. Generally, Google recommends app developers to follow the standard notification styles in most cases. It helps your app to have a consistent look within different Android devices and its OS versions. Nevertheless you can also create your own custom notification where you decide what exactly is displayed in the collapsed and expanded views. Let’s try to create a custom notification and see how their behavior changed on Android 12.
How to Create custom layouts
For our custom notification, we’re going to prepare two layout files for collapsed and expanded views respectively.
There are two points you may have noticed: fixed layout height and TextView style.
- According to Google documentation, custom notifications height for collapsed view layout is now limited to 48dp. The limitations for expanded and heads-up view layouts you can find here.
- Since the background notification color differs across different device models and OS versions, Google strongly recommends not using fixed color for the text in notifications. Instead, use TextAppearance.Compat.Notification styles to adapt text and background color without blending it (black-on-black/white-on-white).
Create notification channel
To show notifications we need to create at least one *NotificationChannel *and set parameters like channel ID, description, name and importance level. The best approach is to create a channel one time once the app starts. To do this we can extend an Application class:
Set up custom notification
The part of the Android system that displays notifications is a separate process that differs from the app’s process. That’s why we have to use RemoteViews to pass a layout to this process. You should consider the following steps:
- Construct NotificationCompat.Builder with a notification channel ID.
- Сustomize the notification with an icon and color if you want.
- Provide custom view layouts with the *setCustomContentView() *and setCustomBigContentView() methods to make collapsed and expanded states consistent.
And then finally show our custom notification with the *NotificationManagerCompat.notify() *method. For notificationId use any unique value you want to be an ID for the notification.
Show custom notification on Android 12: appearance changes
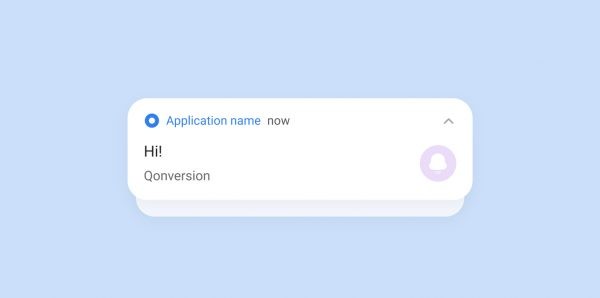
Earlier, custom notifications could use the entire notification area. For apps targeting Android 12, full customization of the notification is no longer allowed. Instead, the system uses a standard template to show custom notifications:
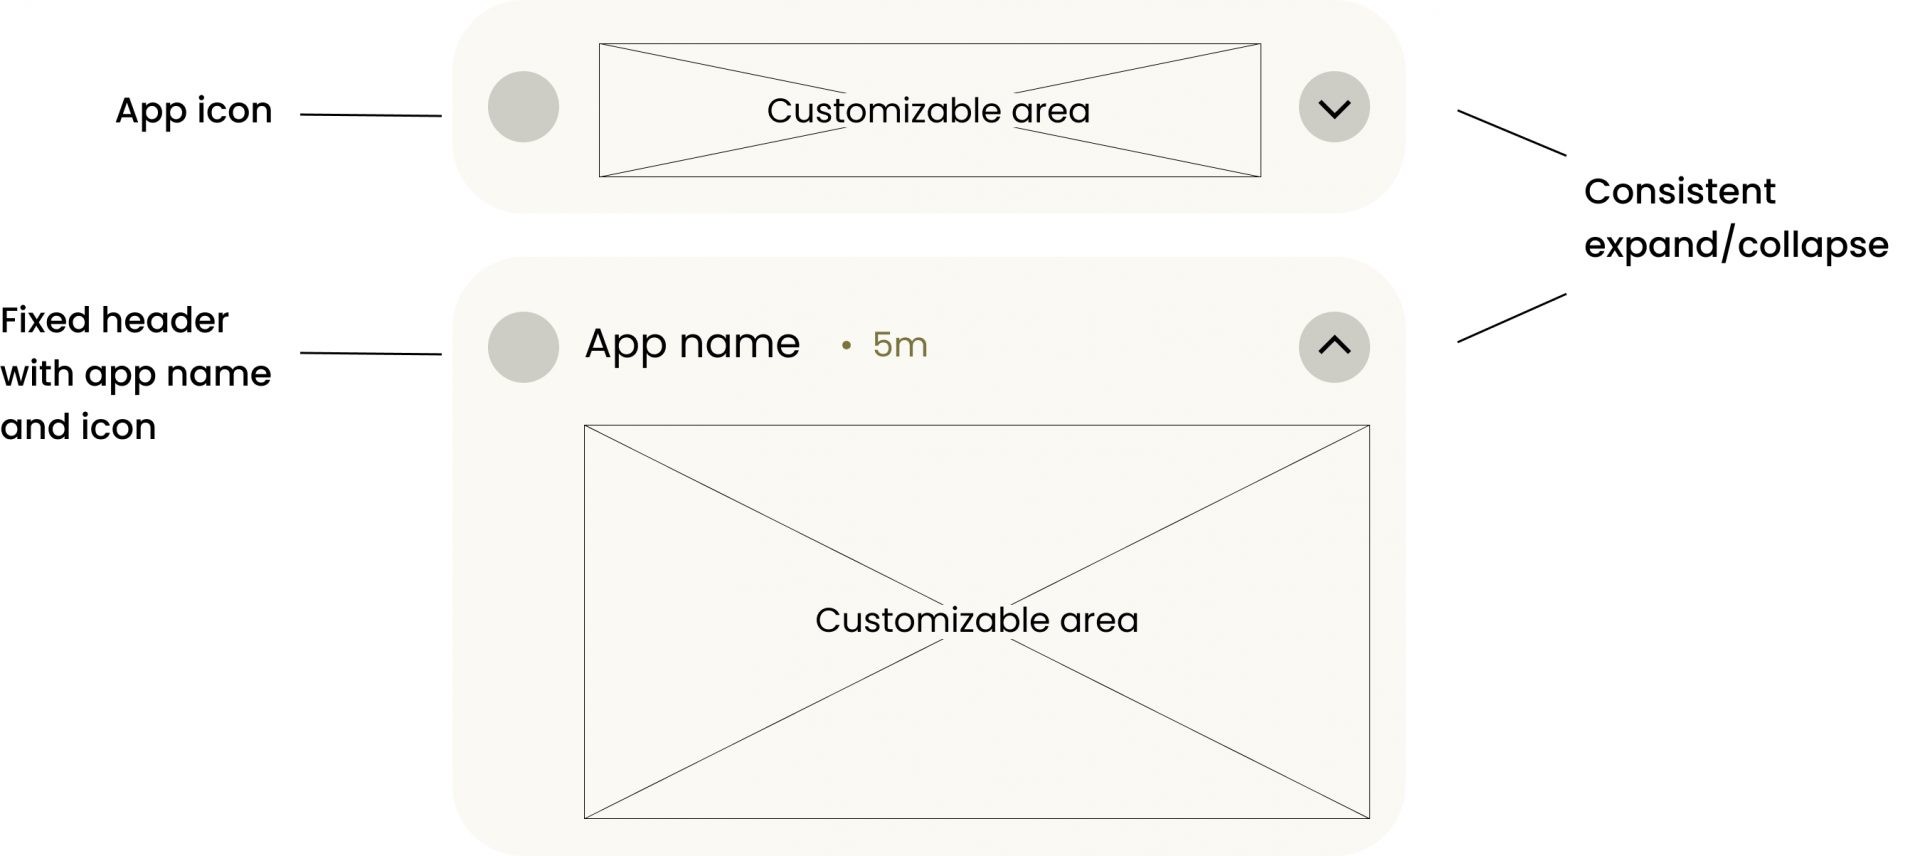
Standard template for a custom notification
Let’s try to run our code and display the notification on Android 12 and for comparison on Android 11. As a result, the lock screen looks like this (both collapsed and expanded states are below):
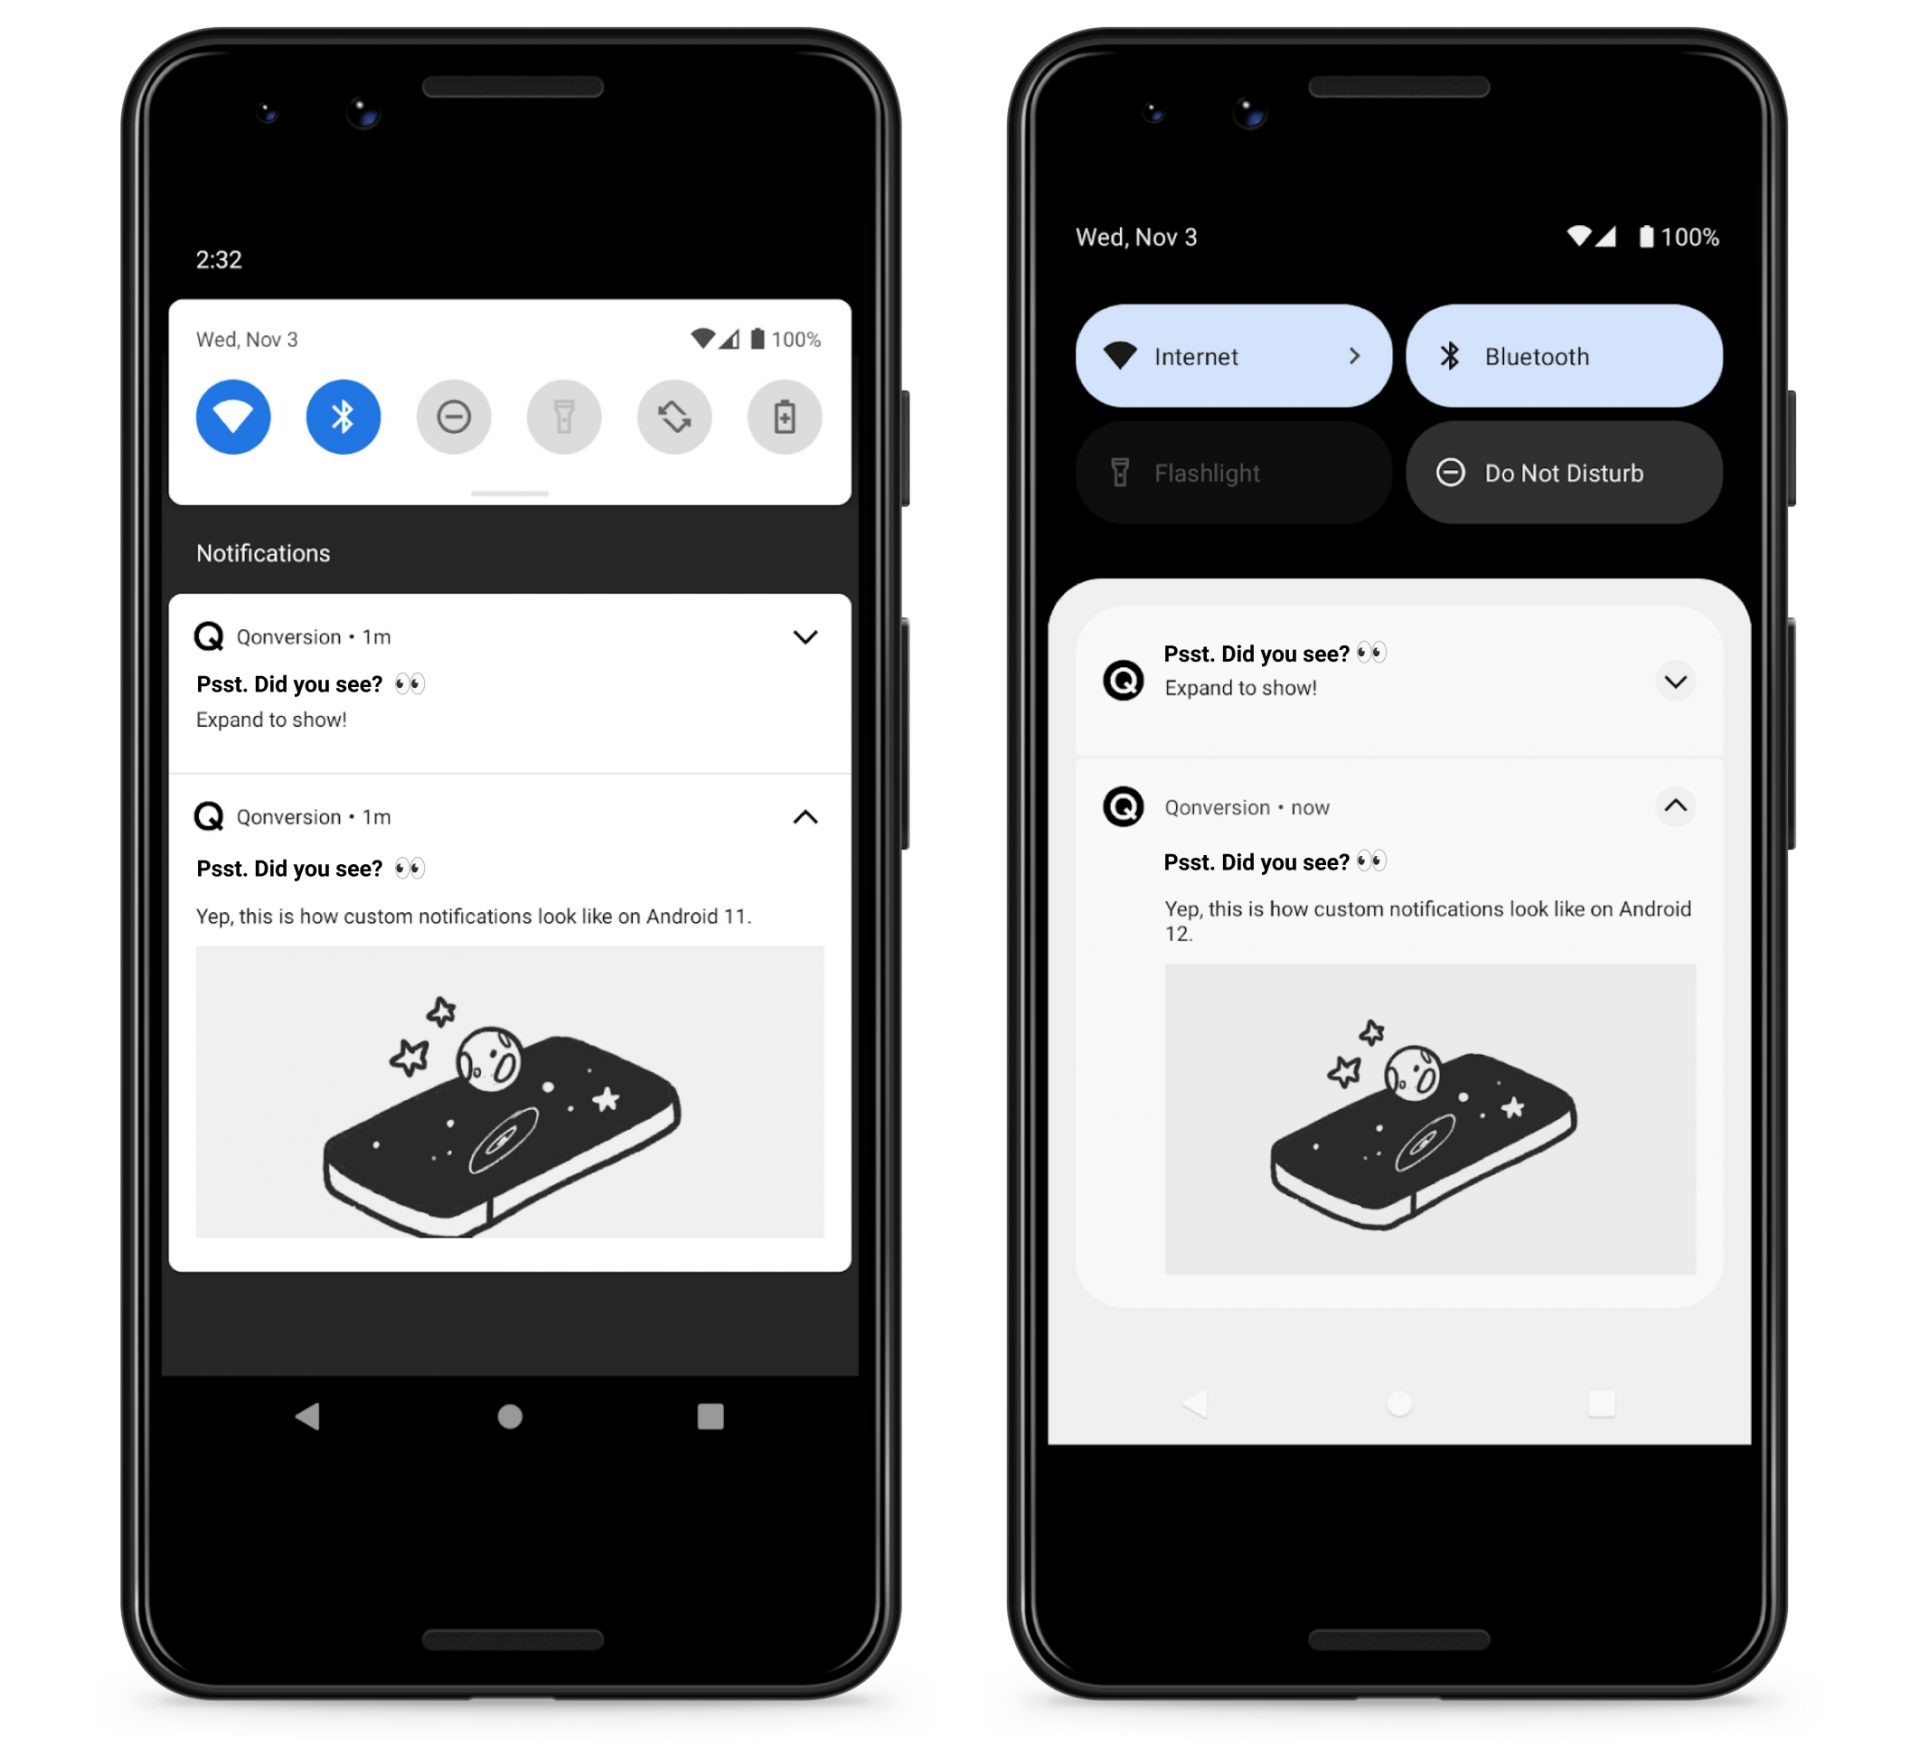
Android 11 vs. Android 12
You can see that notifications on Android 12 were displayed according to the templates mentioned above. As a result, for the collapsed notification the app name has disappeared and the app icon moved from the top to left side. The expanded notification occupies a smaller area horizontally and a larger area vertically. Google also changed the notification icon’s color and shape for both states. In order for these updates to work correctly, Google highly recommends testing custom notifications in expanded and collapsed states with different devices and its orientations.
How to trigger personalized notifications with Qonversion
We truly believe in the power of personalized push notifications. It is even more important for subscription-based apps that assume long-term communication with the user. Personalized notifications show your customers that you care about the experience that they have within your app. Moreover, it is smart: sending notifications based on user behavior increases conversions from such notifications. You can suggest a trial or discount or simply ask why the person wants to leave. Such notifications can reduce the churn rate, allow to win lapsed customers back, or remind your customer about how valuable your app is. For such cases, Qonversion has an Automation tool. Let’s take a closer look at how you can trigger your notifications.
How to create and handle push-notification
To create automated push-notification, you should set the three key components within the Qonversion dashboard:
- Event-based trigger (when user wants to unsubscribe, cancel the trial, etc.). A full list of subscription events is in the dashboard.
- Action (send push-notification). Within the Qonversion dashboard, you can also build the design for your notification.
- Segment (set of users who should receive notification).
Once you complete these settings on the Qonversion dashboard side, you should configure notifications on your app side. Qonversion uses Firebase Cloud Messaging to send push notifications on Android. To enable Qonversion to send push notifications сall *Qonversion.setNotificationsToken() *and pass a device registration token. Here you can find more about the ways to retrieve the token.To be able to work with Firebase notifications, create a service that extends FirebaseMessagingService. Override the onMessageReceived() method. Every time you catch a RemoteMessage, create and show the notification to the user. Notifications are not the only option for Automation. Qonversion also allows you to create in-app screens and paywalls that push notifications refer to. The screen should be displayed after push notification is clicked. To define the behavior for users’ clicks on push notifications you have to specify an instance of the PendingIntent object and pass the RemoteMessage as extra data. Then call the setContentIntent() method of the *NotificationCompat.Builder.*In the NotificationActivity onCreate() method retrieve an instance of the RemoteMessage and call Qonversion.handleNotification() with the message data. If the notification was received from Qonversion, SDK will try to display the screen that was linked to the notification.
Summary
The appearance and behavior of fully custom notifications are one of the significant parts of the massive Android 12 redesign. As Google explains, these changes allow notifications to fit better with Android 12’s harmonic, personal-oriented aesthetics and work faster.
While the notifications became more appealing, it doesn’t guarantee that users would welcome them. Deliver custom, the most relevant information to each user to unlock the power of this tool. Trigger notifications based on user behavior or simply use the Automation tool, communicate with customers via notifications, ask about their needs and bring them the very best value with these notifications that you can.

Maria
Qonversion Team
Maria creates content about in-app purchases and subscription testing.