Just like every year, Apple’s Worldwide Developers Conference took place yesterday. Without too much preamble, we are excited to share some key takeaways with you.
In this piece, we’ll focus on StoreKit 2, which introduces several new features to improve how developers handle in-app purchases. As a quick refresher, StoreKit is Apple’s framework that allows users to make secure in-app purchases across all Apple platforms. So, what’s new in StoreKit 2?
What is StoreKit 2?
Here are some of the main things you should know about StoreKit 2:
- It’s designed with a Swift-first mindset.
- There are new and enhanced APIs.
- Transactions are simplified and more secure.
- Customer support is enhanced, allowing users to manage their subscriptions directly within your app.
- Testing capabilities have expanded with the ability to test apps in Xcode and the sandbox environment.
Now, let’s dive into the specifics.
The New APIs in StoreKit 2
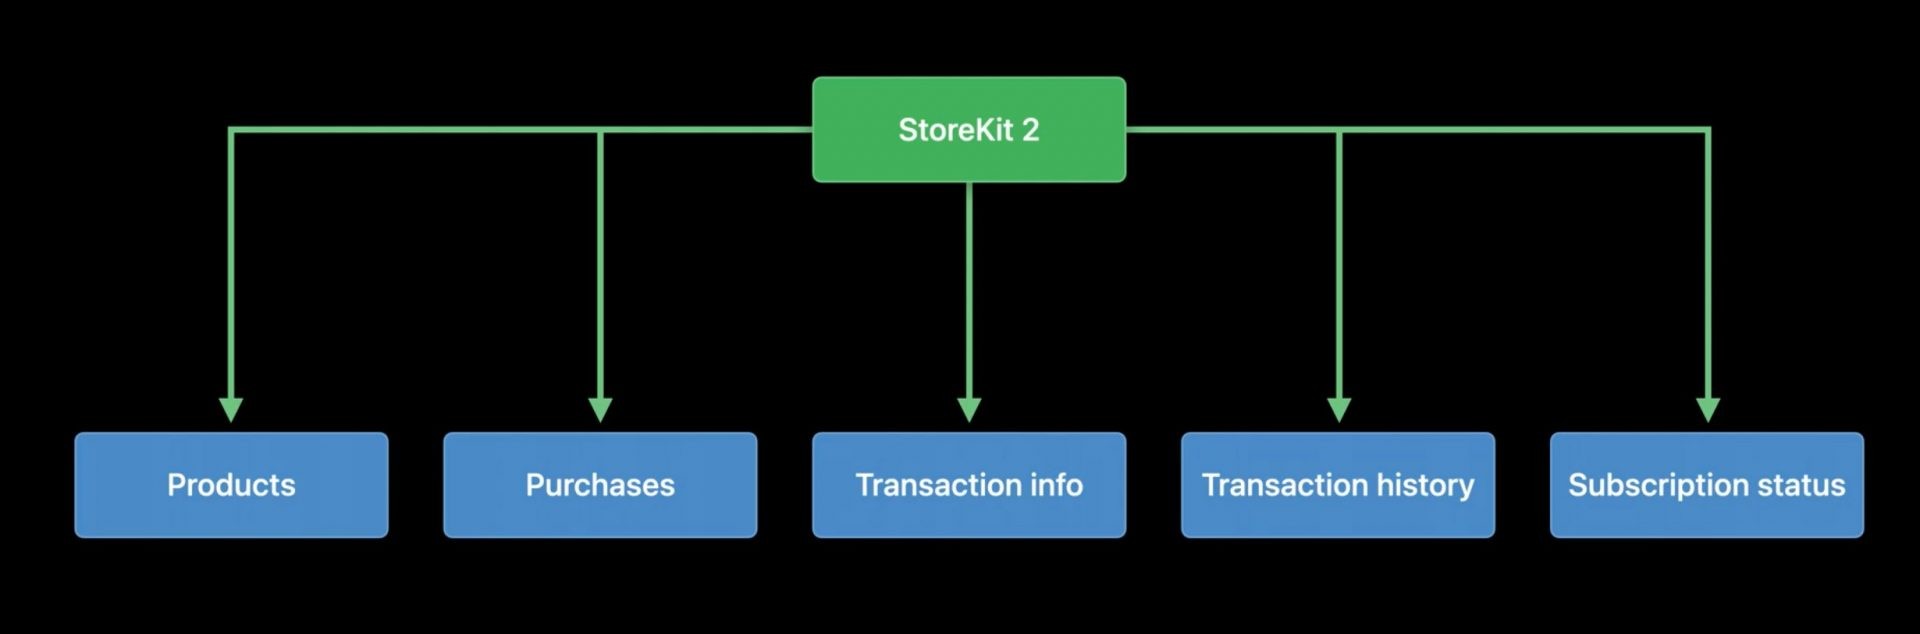
The new StoreKit 2 APIs consist of five main areas:
- Products
- Purchases
- Transaction information
- Transaction history
- Subscription status
These areas form the foundation of StoreKit 2, especially when it comes to managing in-app purchases.
Products and Purchases
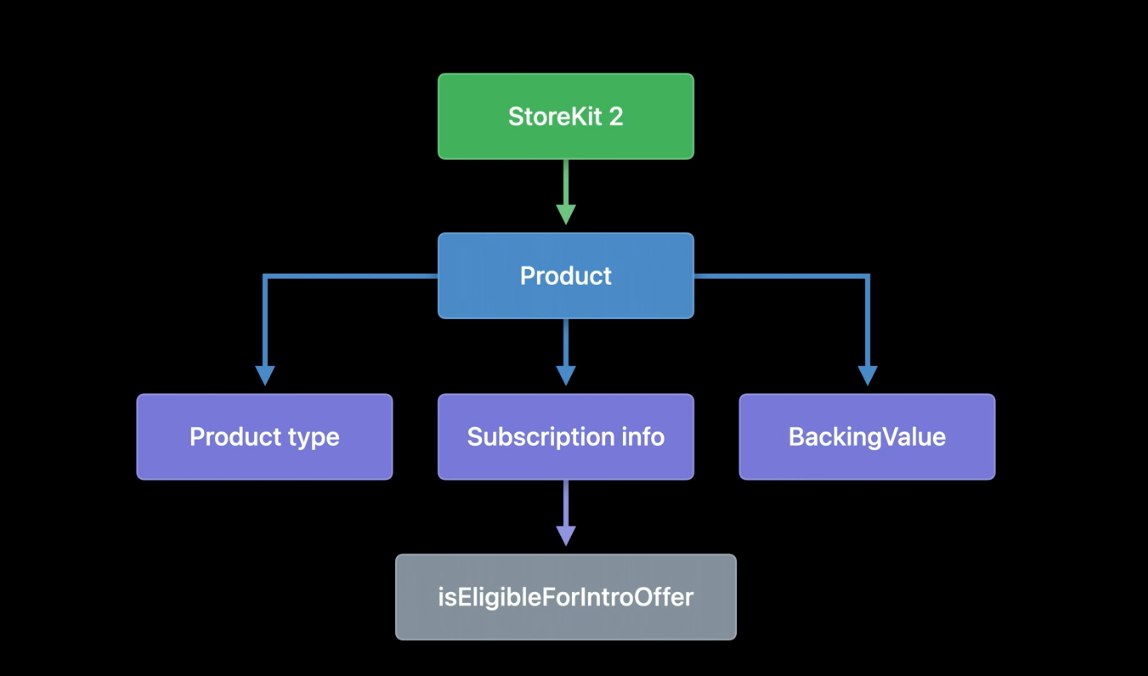
The StoreKit 2 product struct is a supercharged version of the StoreKit product object you’re used to. It has been enhanced with additional data, specifically Product types and Subscription information. Now, it’s easier to determine whether a customer is eligible for an introductory offer.
Moreover, StoreKit 2 products are now forward-compatible with new features. Thanks to Apple adding a wrapping type called BackingValue, you can now retrieve data contained in the products by subscribing to them directly.
What does this mean? If in the future, Apple adds data to products, you’ll always have the ability to access them in StoreKit 2. Simply put, you can now use the latest features to provide new functions to a more significant portion of your customer base.
With StoreKit 2, you request products by calling a static function on the product type. This action requests product metadata from the App Store. However, due to the new Swift concurrency async/await pattern, the StoreKit 2 product request only needs one line of code. Likewise, purchasing a product is also a one-line task.
Purchase is now an instance method on the product type. You can take the retrieved products and call purchase directly on them. In return, you get the purchase result in line with your code.
Of course, purchases aren’t all identical. So, if you want to modify purchase behavior beyond the default setting, you can do so because StoreKit 2 has purchase options.

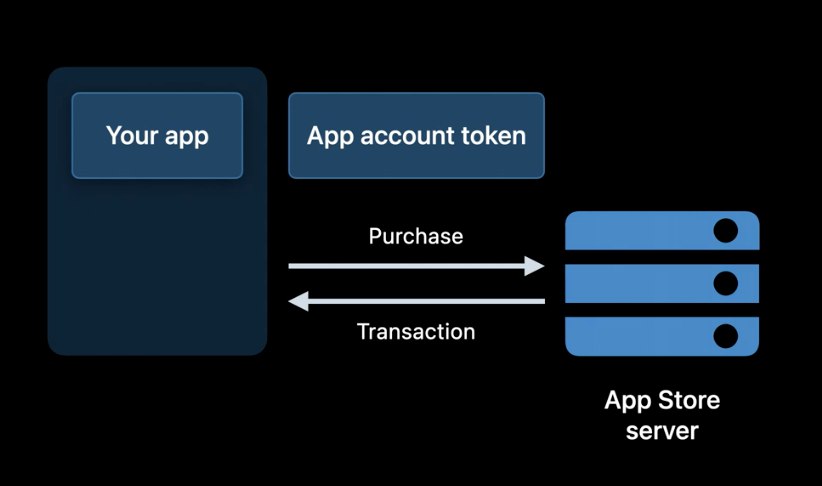
A purchase option describes a single property of a purchase. Purchase options can be composed into a set and passed into the purchase method. StoreKit 2 includes purchase options for quantity, promotional offers, and an app account token. The latter provides a way to keep track of your app’s user accounts that began and completed a transaction.
You create the app account token, which can be linked to accounts that your app owns. Generating an App account token isn’t difficult; all it has to do is conform to the UUID format.
Moreover, the token will be stored in the transaction info forever. Thus, if your app supports its account system, you can easily keep track of which purchases each in-app account has made, regardless of which Apple ID or device was used for the purchase.
Transaction Information
Having covered getting products from the App Store and initiating a purchase, let’s examine what happens when that purchase is complete.
StoreKit will return a successful transaction to you with cryptographically signed information. There’s nothing new here. However, with StoreKit 2, in-app purchase transactions have been upgraded.
First, Apple’s StoreKit 2 will now provide an individually signed object for every transaction. Plus, from now on, in-app purchase transaction information will be provided in JSON format, making it much more common and easier to work with.
Apple knows that secure cryptographic signing is an invaluable part of StoreKit purchases, so they’ll now use a common standard across the web—JSON Web Signature. Additionally, all the information contained in the signed object will now be available through native StoreKit APIs, making everything a whole lot easier.
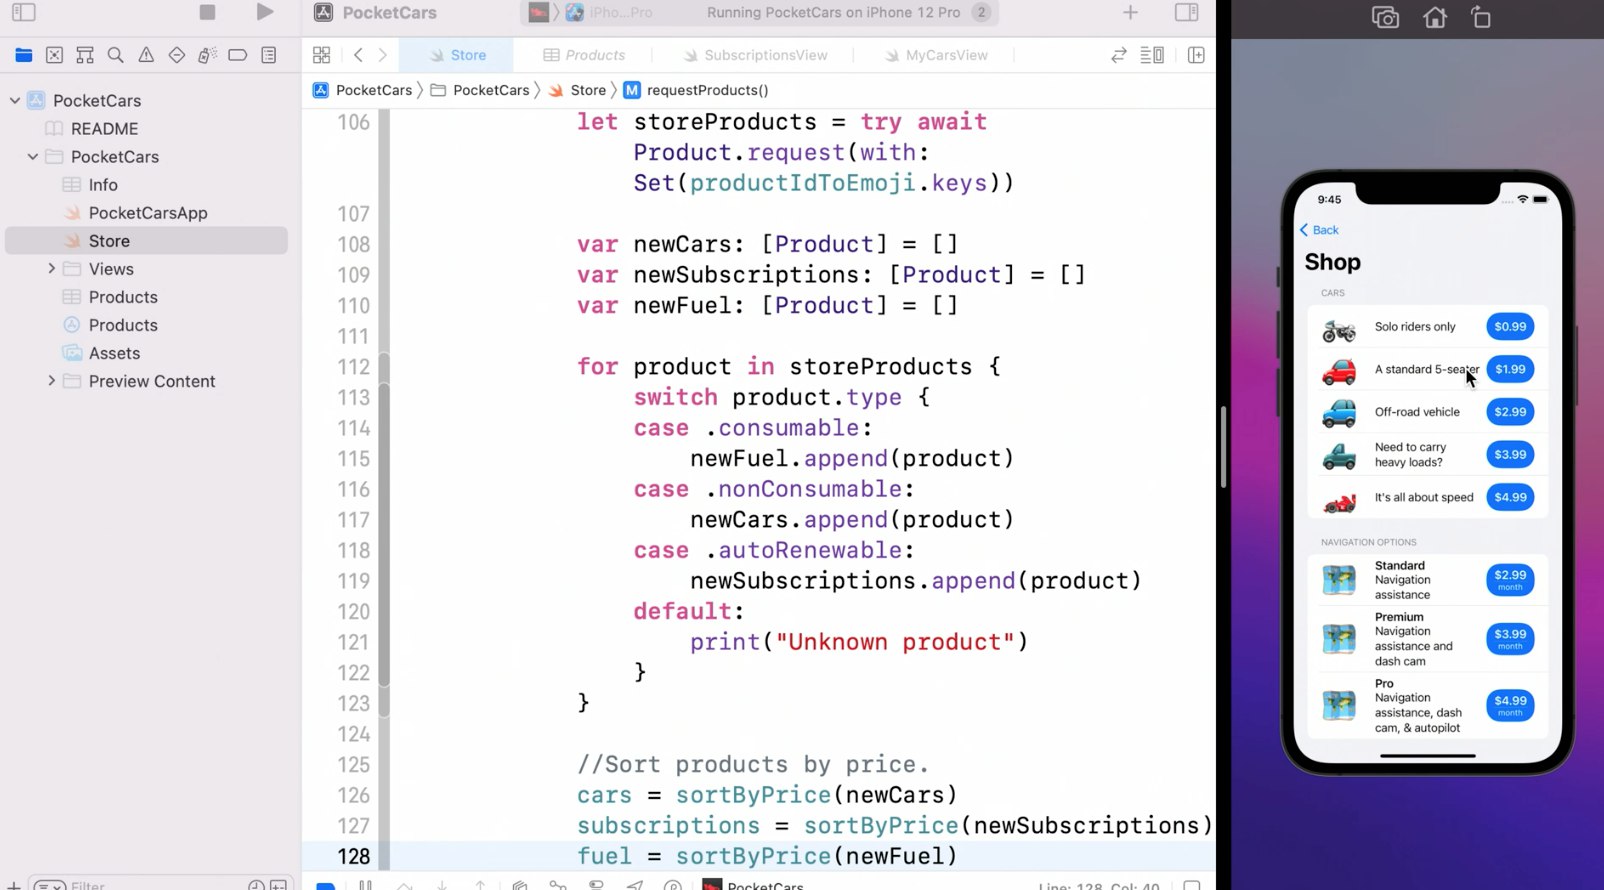
During the WWDC, Apple even showcased an example of how easy it is to set up and run products with StoreKit 2. In the tutorial, the engineer used StoreKit testing in Xcode. This lets you build and test your store before defining products in App Store Connect.
To add products to the sample online store, the following steps had to be taken:
- You can quickly request a product using a set of the product identifiers you want to display by calling a static methodstruct with StoreKit 2 on the Product.
- After receiving the products from the App Store, you can separate them by type. This can be done seamlessly in StoreKit 2 since the Product type now provides a property of the kind as it’s defined on the App Store server.
- In the example, the store owner sells three types of products — fuel, cars, and a navigation package. Fuel is a consumable product; all consumables go into the fuel array.
- Cars, on the other hand, are non-consumable. So, all the non-consumables go into the car array.
- Finally, the navigation package is a subscription product with three service levels. So, all the auto-renewable subscriptions go into the subscriptions array.
Like that, all the products are now displayed solely with the help of one line of code.
Next, we need to get the “Buy” button to function. This is done by calling the purchase method on the product.
When a purchase is completed, a PurchaseResult is returned. It lets the developer know whether the purchase was successful. The developer can switch over them to handle whatever it may be.
If the PurchaseResult shows “success,” you’ll also see a verification result which can be either one of the two:
- Verified
- Unverified
The great thing is that StoreKit 2 does the transaction verification for you. With your transaction verified, you can deliver the content to the user.
Once the user receives the content, you must ensure StoreKit finishes the transaction. Then, to update the UI, you must return it.
In the showcased example, and likely in many of your apps, the app has an account database that the developer maintains. Hence, it’s natural to want to include the app’s currently logged-in user with the StoreKit purchase so that the information is always available to the App when it gets the App Store’s signed transaction.
This can be done by creating an appAccountToken purchase option, using a tokenized version of the logged-in account, and passing that option to the purchase method.
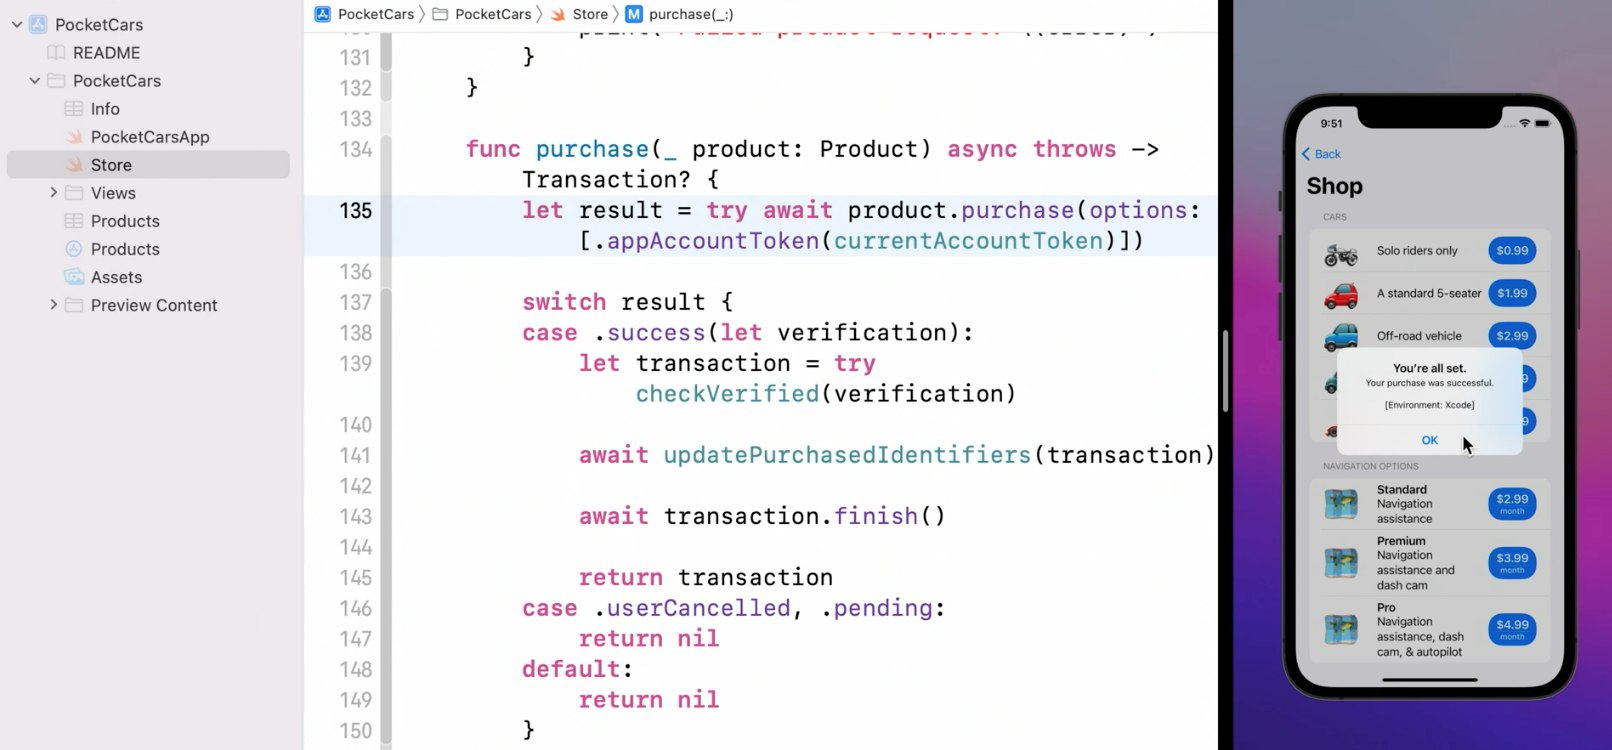
Now, the purchase method implementation is all set.
Moving on, you’ve got to keep in mind that the transaction update listener needs to be started as soon as the app launches so that you don’t miss a single one. It’s best to do this as soon as your store is created.

Also, remember to test the update listener by enabling “Ask To Buy” in your Xcode test environment. Th simulate a purchase response in a pending state.
You can do it by:
Selecting the StoreKit configuration file —> Enabling “Ask To Buy” in the Editor menu —> Running your app again
Hopefully, this summary helps you better understand how the new APIs work. For a complete step-by-step visual, head over to Apple’s overview video. In the meantime, we will move on to the next section.
Transaction History
Apple is now providing a lot of new ways to work with transactions. A new set of APIs has been added to query completed transactions in history. With a single API call, you can access all of the user’s past and latest transactions and current entitlements.
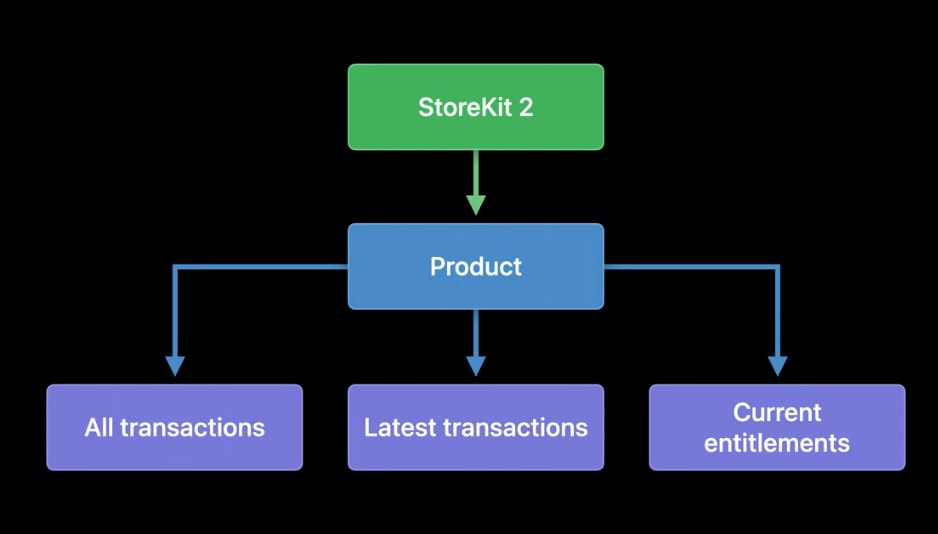
Current entitlements contain two main elements: all the non-consumables in the user’s transaction history and all the active subscription transactions. This provides you with everything you need to unlock all the things the user has paid for in your app.
With StoreKit 2, all transactions are available immediately upon app download. Plus, they are automatically updated in real-time on every device.
This means users won’t have to restore completed transactions when the app is reinstalled or downloaded to a new device. Can you already imagine how much less hassle there will be?
Subscription Status
Lastly, with StoreKit 2, there are several ways for you to get detailed information about a user’s subscription status. As you may know, there are three parts to the subscription status:
- Latest transaction
- Renewal state
- Renewal info
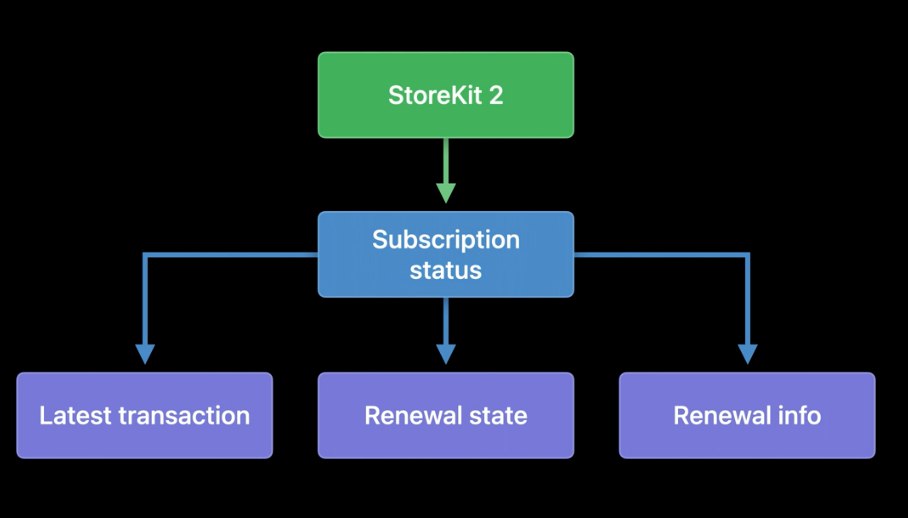
Renewal info indicates the auto-renew status, auto-renew product ID, and the expiration reason. All signed using JWS! As you might suspect, StoreKit 2 can automatically validate your renewal info.
Subscription status APIs return an array of statuses. Primarily because users can have multiple subscriptions to the same product; for instance, a user may have subscribed and received a subscription through Family Sharing. In this case, you should check the array to see the highest level of service they’re entitled to.
Now, let’s quickly cover what working with transaction history and subscription status APIs looks like.
Returning to the demo store, the shop doesn’t illustrate what the user has already purchased. This can be frustrating, but it is solved with StoreKit 2.
With the new version, your app can query StoreKit for purchased products, keeping the UI current.
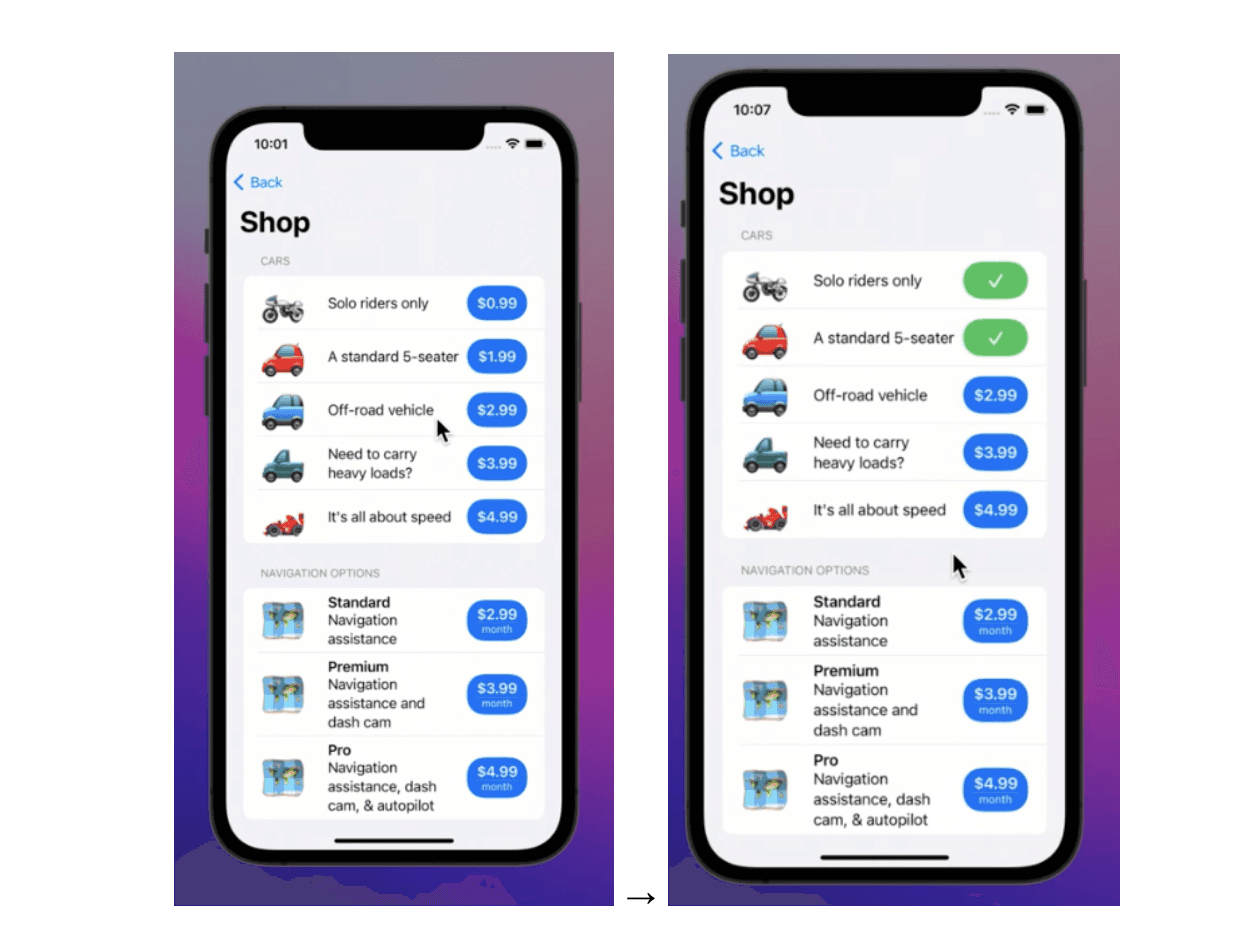
As the above screenshots show, users can now view what products they have already purchased and the statuses of their subscriptions.
We’ve covered the two ways StoreKit 2 uses JWS to enhance security. Now, let’s explore this topic a bit further and examine how you can perform your validation.
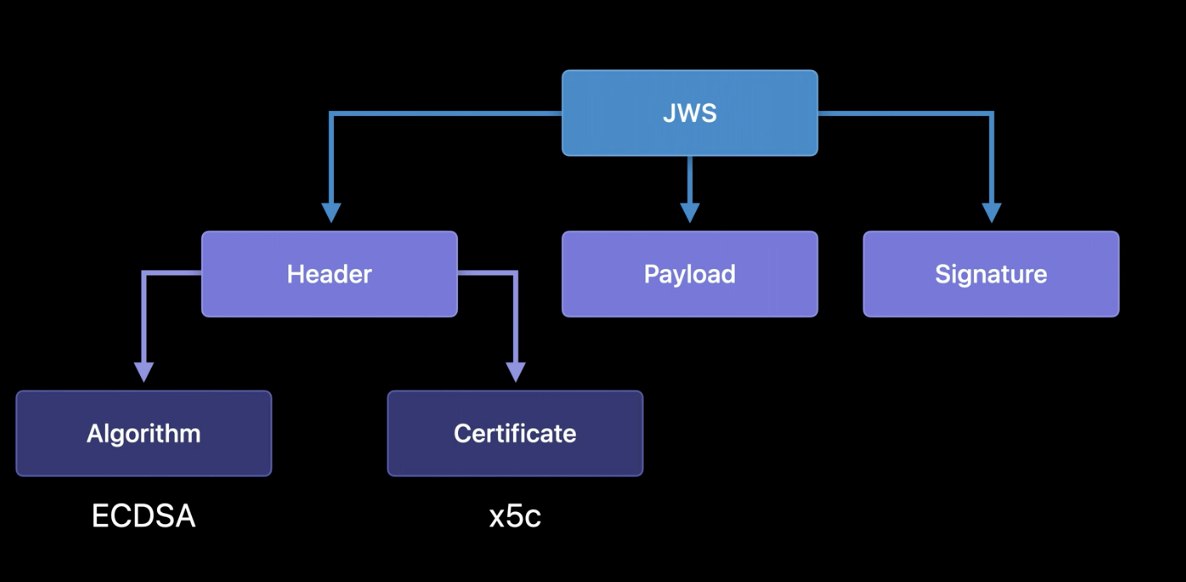
JSON Web Signature
JSON Web Signature contains three parts:
- Header
- Payload
- Signature
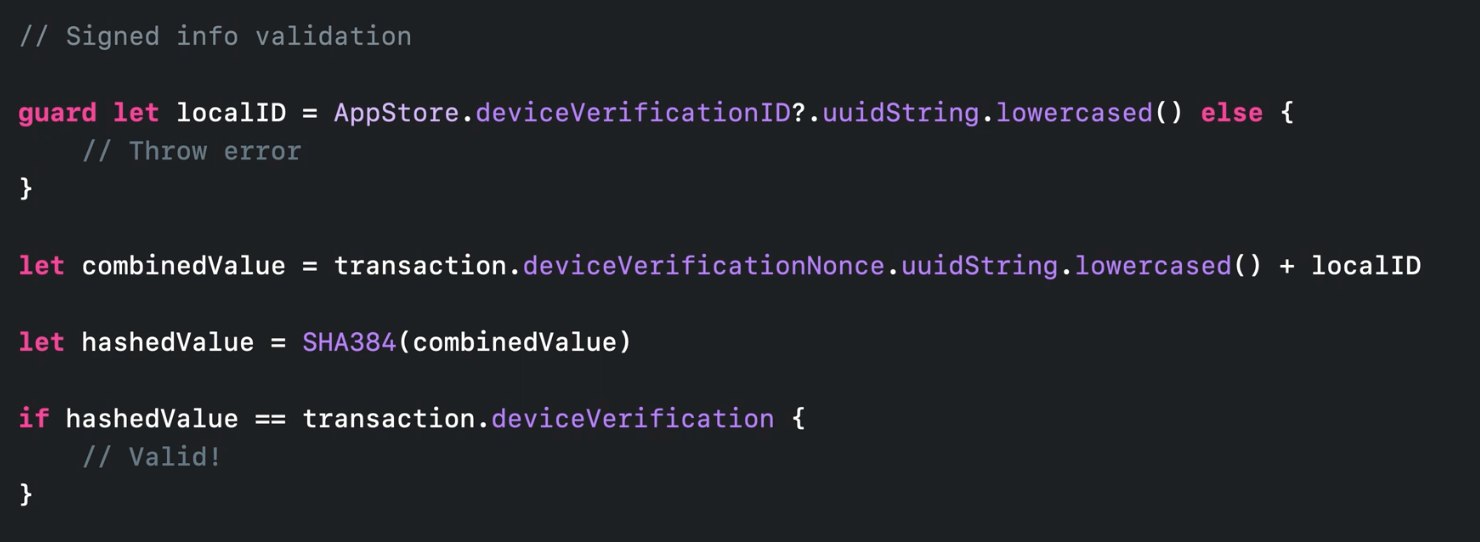
After validating the signature from the JWS data, only a few steps are left to ensure the signed info is valid for your app and the current device.
- Could you ensure that the bundle ID in the signed info payload matches the bundle ID of your app?
- For added security, you can embed the app’s bundle ID in the app rather than relying on an API call.
- Could you check that this value matches the payload?
- Perform a device validation check to ensure the signed info was generated for the device it currently uses. This is what it’ll look like:
Ready to Reap the Benefits of StoreKit 2?
Our Qonversion team is excited about StoreKit 2’s new powerful APIs for in-app purchases, JWS transaction information, and everything else we’ve covered above. After all, as the functionalities expand, so does the value we can offer to the end-users.
We are aware of all new developments and will certainly support StoreKit 2 in all of our products and services.
If you’re looking for a single place to manage subscribers and grant them access to premium content — look no further. Our product center provides complete in-app purchases infrastructure so that you do not need to build your servers to validate receipts.Want to learn more? Don’t hesitate to reach out, and stay tuned for new updates on our blog. We aren’t done covering the WWDC just yet.Moreon Storekit 2 and WWDC Updates:
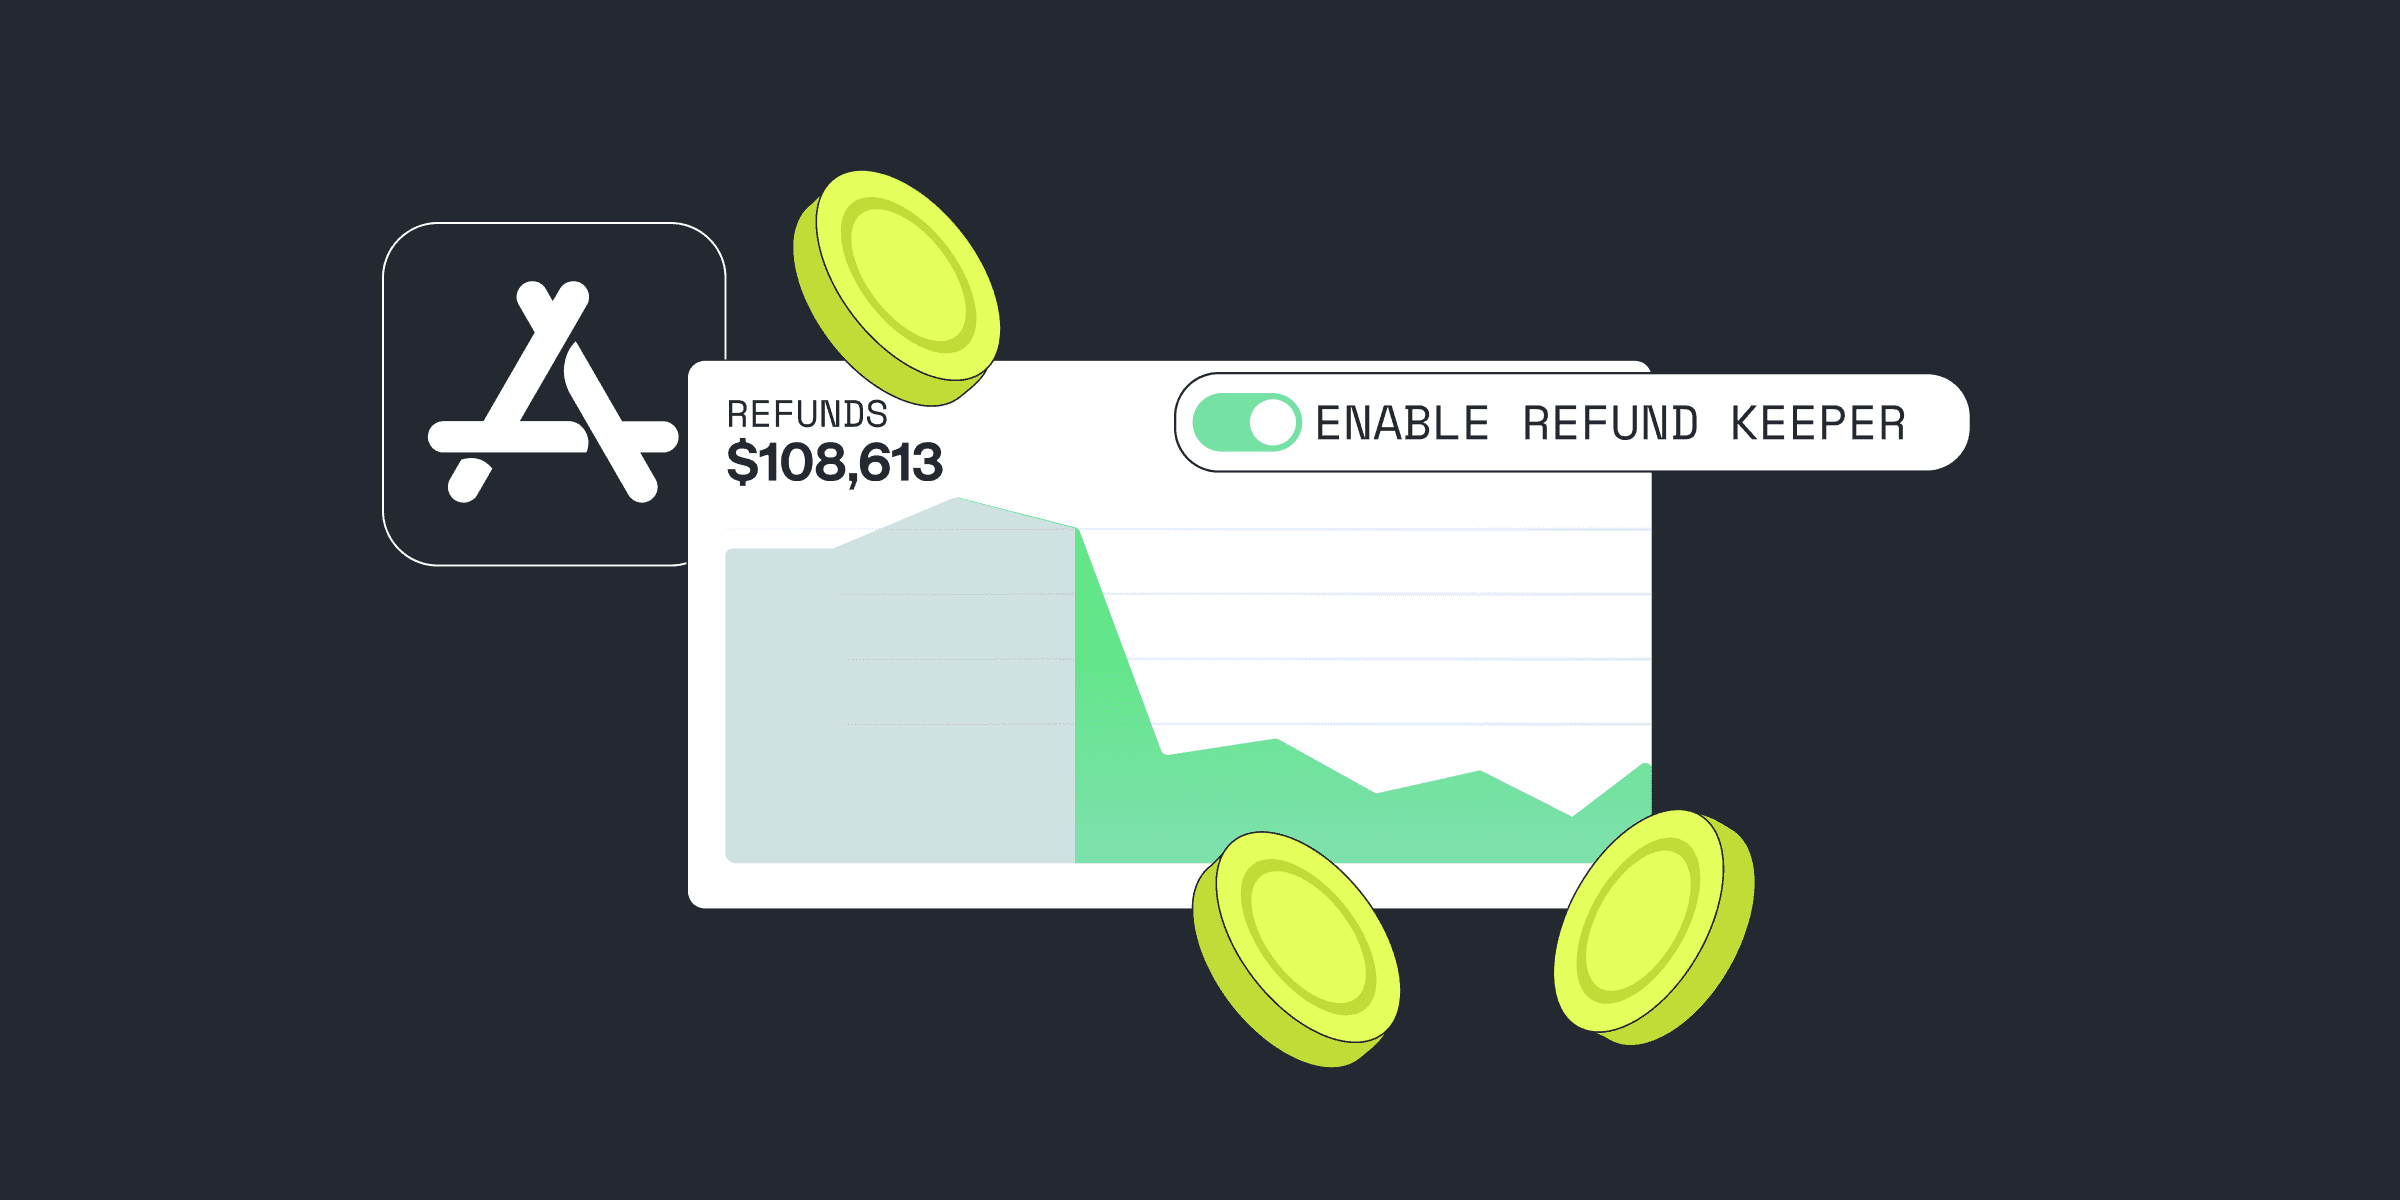
How can you provide better customer support and refund handling with Apple’s latest updates?

Michael
CEO at Qonversion
Michael leads Qonversion with a vision to help mobile apps maximize their subscription revenue.